The Lock down Guide on How to Set up Your Office or Home Schooling Space

So the inevitable has occurred and here we are, heading back into lockdown 2.0, which for many of us here in Mildura, we are returning home to work if we can and the students of Victoria also. The first time around may have brought about many aches and pains, particularly of the neck, shoulders and mid-back, due to a bit of an unideal set up, combined with the extra stress levels that might have also been brought about for some. Sound familiar?

 Here are some tips and tricks to ensure that you don’t end up with a desk related injury from having to move your office and your kids schooling home.

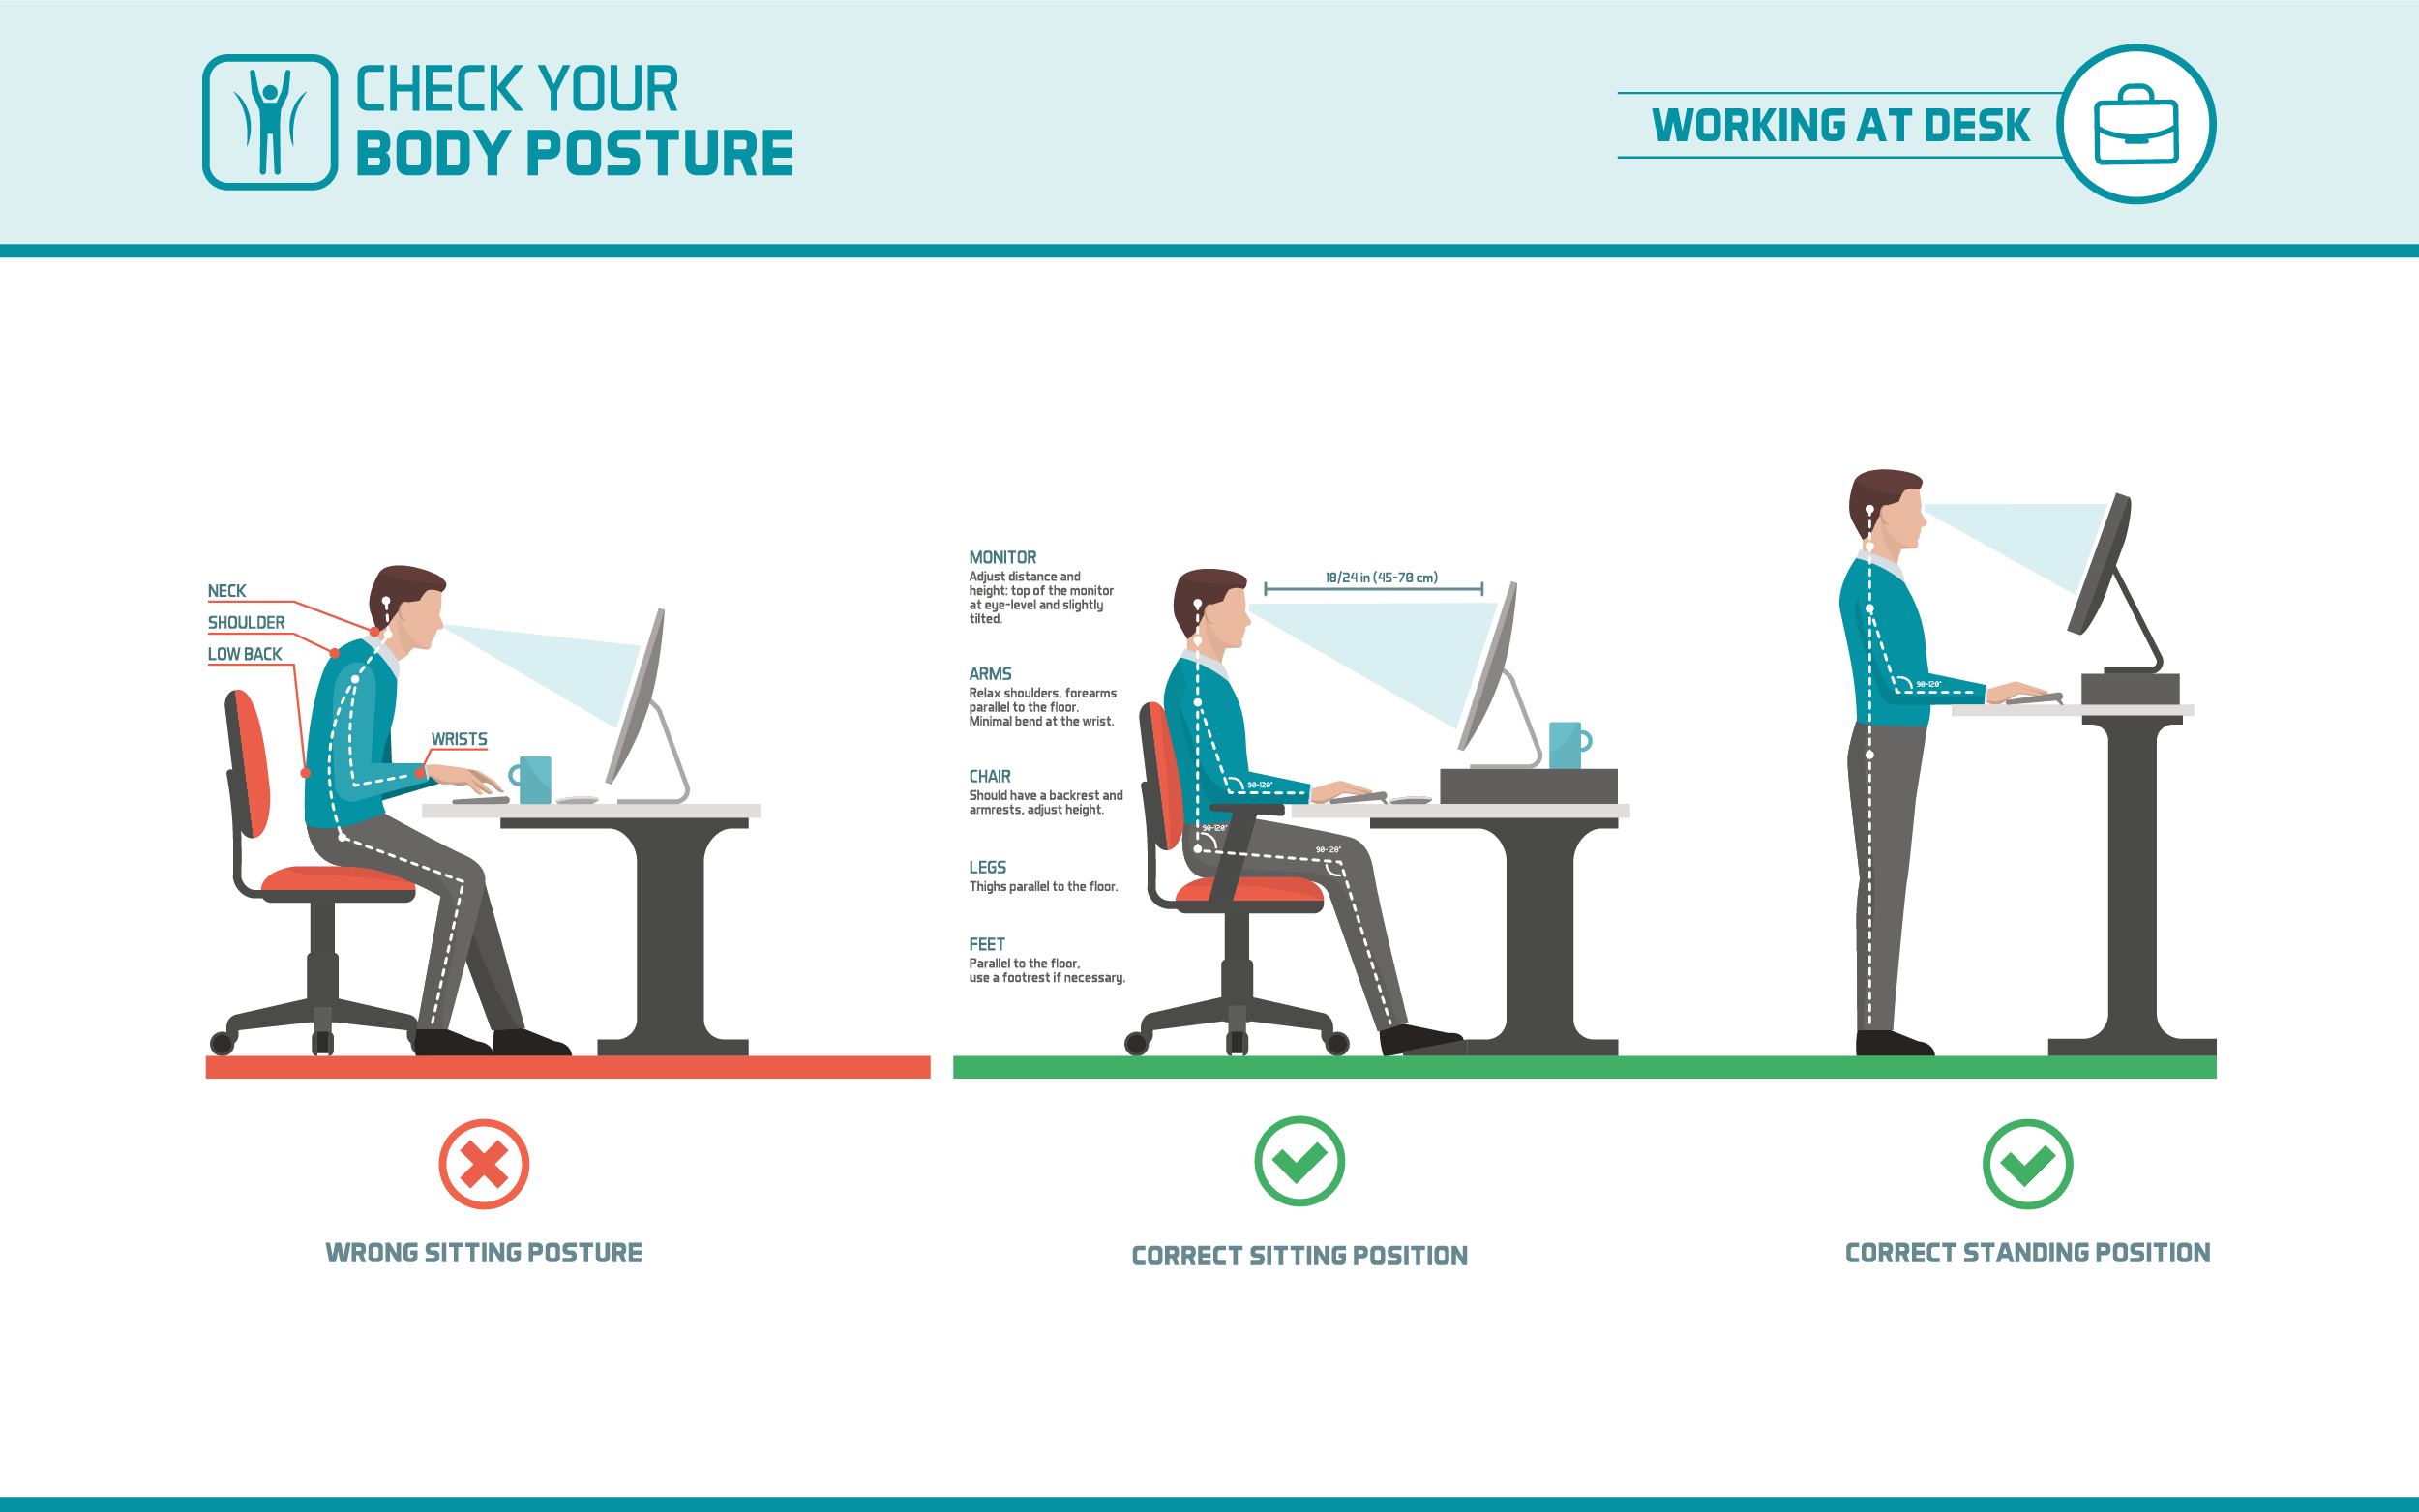
Stand up Desk- If you have the option to- ask your boss to take the stand up desk home (if this is the small, portable kind). Alternatively, if you want one anyway and can afford to – the likes of Officeworks stock these. This will allow you to change your positioning as needed and help prevent the aches and pains that may result from sitting for too long. The human body is designed to change positions often and generally, most of us are better off standing up, as it is more natural to the body. The idea of a sit to stand desk, is that you change the positioning of it when you feel you notice your posture becoming “lazy”. By this I mean you feel yourself starting to slump in your chair or when standing, you start leaning into one hip for example. If this is not a convenient solution, move the desk up and down every hour or so to ensure the body is getting the best of both.

Computer positioning and desk set up– If the sit to stand desk is not an option, you need to ensure you have your laptop/ computer screen at eye level where possible and directly in front of you. This means the top of the screen should be in line with your eyes. Use whatever you have around the house, some old thick books (old textbooks, encyclopedia’s etc) or a box, a small filing system/document holder that might sit on top of your desk, are all great to prop that screen up to eye level. This prevents any head tilt that can cause neck pain. If you find you are straining your neck forwards to see the screen- zoom in on the screen where possible or bring the whole lot closer to you. If working from a laptop and the keyboard is the issue, you can purchase for a reasonable price a separate keyboard from any office stationary shops (most of them anyway). They are worth the investment! If you cannot do this- tilt the laptop screen to the best position for your eyes to minimise the neck strain. Multiple screens make the situation that bit more tricky- the suggestion here is to ensure that you put the one you use the most directly in front of you and the second screen along side it. If you go between the two all the time, put them side by side and when you can, shift your whole body to face the screen you are focusing on at the time- this also prevents neck issues.

Keyboard alignment- If your keyboard is separate to your screen it should be directly in line with the screen if possible.  The letter “H” is around the centre point, use this as your marker and align this with the centre of your screen. If you predominantly use the numbers, position this side of the board more to the centre and move across accordingly.

Phone alignment- In this day and age, most of us are using mobiles for work, particularly if co-workers or clients/patients etc are needing to be contacted. If this is the case and you are on the phone a lot, this can cause us to tilt the head to the side that we answer the phone on, particularly if we are trying to multi-task (often using the computer). This slight head tilt, repeated over and over will cause muscle tension of that same side (most often) and can build up to niggles and sometimes quite debilitating pain. The solution- a head set if possible. Otherwise if this is not available, try to keep the head neutral whilst on the phone and prevent the strain on the neck.

Desk seating-  If you can, a desk chair that swivels, lifts up and down, tilts forwards and back and has wheels is the ideal chair to work from. This is to ensure that you are up high enough to let the arms rest on the desk at approximately 90 degrees, the back should also be around 90 degrees with the legs, and feet flat on the floor. This prevents neck and back strain and ensures that the hips stay aligned with the knees. If the desk is too high and the feet cannot touch the floor, that is okay- adjust the best you can. Foot stools can also be used to address this issue. If the knees are elevated above hip level (usually the chair is too low in this position) this will likely cause hip flexor, quad and glute muscle issues. Bring the chair up to ensure the correct positioning.

Take regular breaks where possible! This is the best thing to do- to change your position up, reduce stress and get some movement into the body (as well as keeping our sanity).

At the end of the day, stretch, do some foam rolling and use the spikey ball through the neck, shoulders, hips and back if you have those at home, to help reduce any built up tension which will also help reducing stress levels at the same time- Win, Win!

If there are niggles that are persisting, that you want addressed before they become quite debilitating or if this is already the case, pop on in to your desired therapist to assist you with these, you can have a chat with them about your desk ergonomics, as well as give you a plan to help minimise pain in the future!

Image source: https://healthandbalance.com.au/workstation-desk-posture-ergonomics/

Redesigning your work-space to alleviate back and neck tension

Working from a desk is an extremely common cause of neck and back pain, often because you adapt to your workstation rather it adapting to you. Signs of this may include, the computer monitor being too far away, too close, too dim. This takes away having ‘good posture’. An average human head weighs just about the amount of a standard bowling ball! When your neck is bent, the head exerts a lot of pressure on the neck. Imagine the strain it is having on you! This then can lead to headaches, joint strains and even possible breathing restraints. This is why redesigning your work-space to adapt to you is necessary. There are many ways to alleviate these problems such as;

Have you got the correct chair?

  • Making sure your chair is at the correct height for you is important, it is better to have a slight recline in your posture instead of being at a 90 degree angle. 
  • Your feet should touch the ground fully.
  • Sometimes putting a small pillow at the bottom of your chair helps you keep your posture correct instead of curving the spine (in other words, hunching over)

Is your desk at a correct height?

  • Adjust your desk correctly or even your chair, so your arms are not pointing upward, rather slightly downward, so that there is no bend in the wrist.

Is your computer at the correct height, distance and lighting suited to you?

  • Adjust your computer screen so that your eyes are at level with the screen,
  • Move the screen towards you or further away so that it is easier to read the screen.
  • Increase the font size perhaps, so you are not leaning in, or squinting at the screen.

Another really positive idea to add to your work environment is setting a timer for every 30 minutes, to stand up and take a walk around the office, do a few little stretches, or even physically deliver a message, rather than email (if it isn’t too important). Some offices have also implemented standing workstations which has been proved to be very beneficial, so perhaps it is something you could suggest at your next meeting.

Bringing these ideas into consideration may help you in the future and relieve a lot of your common issues. 

Spring time Sports Transition

Spring has well and truly sprung and we are heading into the warmer weather now- goodbye winter!

This time of year sees many people coming out of winter hibernation looking to get out in the sunshine to get their bodies moving and for many getting their “summer body” ready. With this sudden spike in activity for those who don’t do a whole lot over the winter period, it can bring on overuse injuries- that good old saying “too much too soon” couldn’t be more accurate. So here’s some tips and things to remember: 

  • Whatever exercise you are re-starting or starting, introduce yourself to it slowly! This can mean a number of things depending on what suits you- your variables being the number of sessions per week, the length of your sessions/activity and your intensity level during these sessions.  We would recommend you do any of the following: start with less sessions (aim to start with around 2-3 per week for approximately 2-3 weeks and then increase gradually if desired, depending on your fitness levels). If that is not enough, reduce your timeframe to again suit your fitness levels (instead of an hour 2-3 x weekly, do 30 mins 4-5 x weekly). Finally, the intensity- this is a harder variable to manage and you tend to find this can be easily overdone in the beginning until your body awareness of your fitness levels develops more. Start slightly lower and build on this- if you do personal training for example, your trainer will be able to monitor you as you go. You might be able to increase your intensity earlier if you are doing less sessions per week as your body will have time to recover between them if they are not performed on consecutive days.  Going hammer and tong first session sounds great in theory but for some, this can leave you feeling very stiff and sore the next day/s potentially reducing your ability to perform for your next workout and the effects can snowball- but recovery can really offset this. 
  • Recovery is one of the most underrated aspects of exercise and the part many of us neglect- it can seem like a chore to many at times but please don’t neglect it as it can most certainly be the difference between you becoming injured or not and even if no injuries occur, it can be the difference between your performance levels from one day to the next. In a competition setting, this can be the difference between you winning or not, if this is your goal. Recovery can be done in so many different ways- the most common recovery option tends to be stretches. While the evidence does not necessarily support stretches right after exercise- this is probably going to be the best time because A- you are already warm and just completed exercise and B- if you do not make time post- exercise you are not likely to make time later (which you should definitely be doing both of these things).  Stretches are not your only option- recovery can include therapeutic aids such as a foam roller, spikey balls, heat and or ice depending on your preference, compression pants and any kind of therapy such as massage, myo or your preferred choice of treatment. As we know, strength comes in numbers and the body loves variety (it literally thrives/lives for it) so the more you can change up your recovery and incorporate different methods- the better off you will be long term. A win win situation and you won’t get bored doing the same thing over and over again.

The team at myosports are here to help you in any way we can from a musculoskeletal perspective – anyone who is willing to be proactive about their health is welcome so if you have any questions about anything mentioned call the clinic to book yourself an appointment to find out just how far you can go this spring or to help get that summer body in shape ? 

Myofascial Benefits of Foam Rolling

Whether you are an active gym goer or office worker, foam rolling is an amazing form of self-massage with many myofascial benefits.

But what is Myofascia?

“Myo” meaning muscles and “fascia” meaning the connective web-like tissue that surrounds and penetrates all our muscles – it also coats every bone and covers every organ and envelopes every nerve in the body! Fascia is what keeps everything separate yet interconnected at the same time.
By using a foam roller, you can stretch, massage and even rehydrate the underlying muscles and fascia. Over time this may reduce fascial adhesions (dense areas of fascia or scar tissue that may be restricting movement) and retention the fascia and muscle into more optimal length and position.

Some further benefits you may experience with foam rolling:

  • Improved range of motion (ROM) – foam rolling may ease tissue tension and muscle tightness to increase joint ROM. Foam roll any restricted area on your own body and test it for yourself, you might be surprised with the results!
  • Improved circulation – myofascial release may help improve circulation by breaking up tight areas or fascial adhesions where blood flow has become restricted.
  • Relief from stress and fatigue –foam rolling may create a deep sense of relaxation. Try the beginner foam rolling routine below before bed with no interruptions and notice how you feel at the end of the routine.
  • Faster recovery time – we now know the benefits of foam rolling before exercise but doing it after may also help reduce muscle soreness and the new collagen from forming fascial adhesions between the layers. Again, the beginner routine below will be well suited to this as well.
  • Free massage for the rest of your life! It’s an inexpensive option and gives you the benefit of taking your health & wellbeing into your own hands.

Basic Foam rolling routine

  1. Calves
  2. Hamstrings
  3. Lateral borders of IT band – rather than rolling directly on your IT band you will find more benefit in rolling the lateral borders of the IT band.
  4. Gluteal muscles
  5. Adductors (inner thighs)
  6. Quads
  7. Upper back

Tips for success

  • Perform slow rolling movements to relax, release or rehydrate your muscle and fascial tissues
  • Roll for the amount of time your body requires
  • Roll daily or every second day, just avoid any areas that feel bruised
  • Avoid directly rolling on your lower back.
  • Avoid any areas that cause numbness, pins and needles or have a pulse.

If you have any injuries or medical conditions however, please only use as directed by your health care practitioner as the roller may not be suitable for use for the injury or condition that you may have.

Benefits of Myo for Pregnancy

Pregnancy can be one of the most beautiful times in a woman’s life, that natural glow that emanates from her as a miracle is being made. Whilst pregnancy can be this way, with the changes that occur, for many there are other things that may come from this time in their life, such as general fatigue, back pain, cramps and pelvic pain to name a few. The great thing about Myotherapy is that the assessment and treatment we can perform can be beneficial for someone experiencing the pain and discomfort that may arise because of pregnancy.

So, what specifically can Clinical Myotherapist assist with?

– Pelvic girdle pain and instability

– Back pain

– Nerve Pain, particularly down the leg

– Generalised overall pain from low back to the neck region (as the posture changes with the growing baby)

– Advice and education on proper pre-& post-natal exercise routine and techniques.

– Cramping

– Releasing those swollen and tired feet!!!!!

We provide a thorough assessment and use gentle to firm hands on techniques, as well as applying and fitting therapeutic aids to assist in pain relief and structural support to the pelvis, spine and your growing tummy.

Ask us about our complimentary tubigrip fittings to help prevent too much abdominal separation!

With all this in mind the effects and benefits that Myotherapy may produce for you are; improved rest, reduced pain, improved movement, promotion of relaxation and better-quality sleep which allows you to function optimally throughout this time, essential for creating your bundle of joy!

Spikey Ball Use

Why use a Spikey ball??

Spikey balls have cone shape “spikes” which can help to relieve muscle tension in areas that you may feel are particularly tight. Spikey balls have many benefits including muscle relaxation, improved range of movement and may even assist with reducing pain and increasing flexibility of the area that the ball has been used in.

How do they work?

Spikey balls have cone shape “spikes” which can help to relieve muscle tension in areas that you may feel are particularly tight. Spikey balls have many benefits including muscle relaxation, improved range of movement and may even assist with reducing pain and increasing flexibility of the area that the ball has been used in.

Who are they suitable for?

Almost anyone from athletes to desk workers and anyone in between.  It doesn’t matter what age you are, as long as you are properly educated on how to use them properly.  NOTE: If you are carrying an injury or have any medical conditions that may render you unable to use the ball, please consult your health practitioner prior to use.

Spikey Balls can also come in handy for anyone suffering from a wide variety of conditions, some of these will be covered here. 

Plantarfascia (Foot) Spikey-Ball Rolling

Rolling the spikey ball through the plantarfascial region (beneath the foot through the arch) can assist to release the small and deep muscles of the foot as well as that outer fascial layer called the plantarfascia. It can also assist people who have tightness within their calf muscles, people with generalised foot pain and anyone who may require an orthotic or innersole within their shoes. To perform this, roll the ball beneath the foot – start sitting down on a chair and if this does not feel enough, stand and place more of your weight over the ball for a deeper release. If the spikey ball is too painful in a seated position, commence with a tennis ball and progress to the spikey ball when you are ready.

Gluteal (Bum) Muscle Rolling

This type of rolling may be suitable for people who suffer low back pain, tight glutes from activity such as gym work, sport or sitting in a car or at a desk for long periods of time and those with generalised glute pain. It may also help to relieve pain that might be referring down the leg, caused by the glutes. Place the ball beneath your buttocks- seated on a chair, standing against a wall or on the floor- be mindful carpet floors will absorb some of force, so you can perform on a hard floor, such as tiles or floorboards for more intense or firm pressure. Move around on top of the ball, finding the points of tension and hold these points until you feel as though the pain is lessening- if the pain does not change after a minute or so, move on to another point of tension, don’t worry the ball is still doing its job.

Mid-back (Thoracic Spine) Rolling

The mid back region can become very tight and cause many issues such as headaches or generalised stiffness and limited movement. Common in those of you who work in the office seated at a desk for most of your day.
This area can be done by either laying on the ball or standing against a wall with the ball between yourself and the wall. To roll simply place in the desired area of tension- most likely between your shoulder blades- and move up and down with the ball, resting on the points that may be more painful or tense. Ensure the ball is not resting over the spine, as we want to be using it over the muscle bulk (alongside the spine) plus it will probably be too uncomfortable in this area. Roll for a few minutes either side.

General Rolling

The different areas that the spikey ball can be used are almost only limited by your imagination and of course your pain threshold! Sometimes pain may not change while using the ball, this is okay, take another look at the movement you felt was restricted or stiff if this was your issue and see if that has changed.

If you have any injuries or medical conditions however, please only use as directed by your health care practitioner as the ball may not be suitable for use for the injury or condition that you may have.